
But when I opened her email with the new file, it was exactly the same (small) size.
I realized what was probably going on, as I’d seen this happen before. It was due to Apple’s oh-so-subtle user interface, specifically in Apple Mail.
When attaching images to an email – and only then – a small menu appears at the upper right of your message labeled “Image Size”. It lets you specify the size you’d like the attachment to be sent at. Usually you just want Actual Size, but you can also select from options Small, Medium or Large.
And it’s easy to miss.
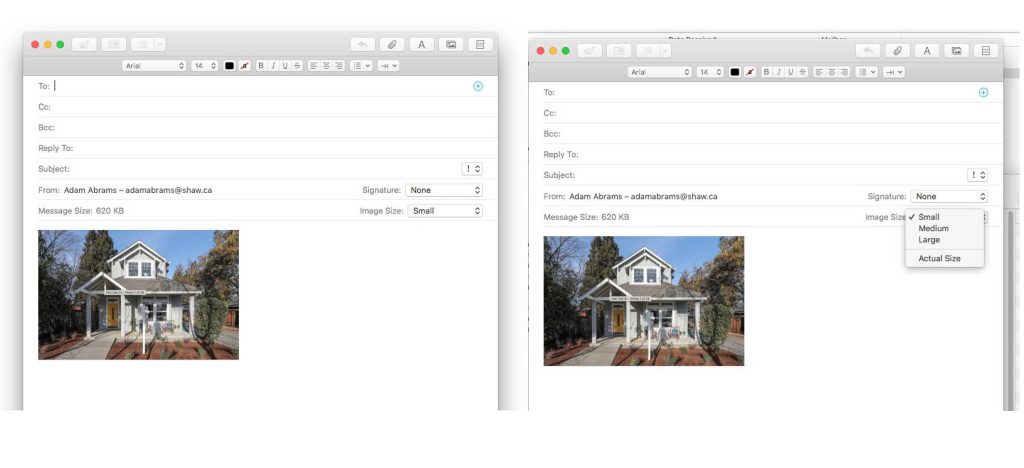
The Image Size menu only appears after adding an image to your email in Apple Mail.
Though it doesn’t say so, the three options will resize your image to 320, 640 or 1280 pixels wide, respectively. It works with JPG and GIF images, but PNG files are left alone (that’s what I found in my experiments, anyway).
That “Image Size” menu will remain on whatever choice it was last set to – which can lead to unexpected results. So, if you want to ensure you don’t send tiny versions of large images, be sure to double-check this menu before hitting “Send”.
While this setting seems mainly to be a vestige of an earlier time when email size limits were more limited, it can still come in handy if you’re sending a bunch of very large images for someone to review, and they don’t need to see them at full size. In that case, the “Medium” or “Large” options can be useful to keep things simple and easily viewable for the recipient.
But otherwise, be sure to keep this set to “Actual Size”. Your designer in particular will thank you!
Thanks you! Exactly what I was looking for; I expected some such thing. My wife is a graphic designer and often encountered such problems getting images from clients.
I’ve tried this and although ‘mail’ says message size 10mb, when the recipient opens these files they come out way too small again !
my medium setting is grayed out. Why?
Hi! I do find that, if the image isn’t too large to begin with, the “Large” option is indeed greyed out. An even smaller image causes both the “Large” and “Medium” option to be greyed out. I assume that’s what’s happening…
I used to be able to select a size for a photo in Mac Mail, but it only gives me the option of “actual” or “Small” – “Medium” and “Large” are grayed out.
This should only happen with smaller images, in which case the “Large” or “Medium” settings are considered redundant.
Hi all, does anyone know why only certain email accounts on Mac mail have this dropdown option in the top right? I use crazy domains for the email hosting and only one of the accounts has this image size option. The rest of the accounts don’t have it. Is there a setting somewhere I need to change? HELP 🙂
Hi Courtney! In my experience, the only factor that affects whether the image size option appears, is the size of the attachment you’re trying to add. If you’re getting different results for different email accounts, with the same attachment, that is definitely strange. I’ve always had a great experience contacting Apple Support for things like this, you might want to give that a try!
Thank you SO MUCH, this was driving me crazy. I’m a little ashamed for not having noticed that little appearing menu… I guess the designer in you is like a hawk, noticing everything!
Thank you so much. I was in a bit of a pickle and you reminded me of that lovely drop-down. Problem solved!